Friday, December 2, 2011

To All My Toblerone Fans Out There, I'm Sorry


This is going to sound weird but I think I made a mistake and I’m sorry for it. Let me explain…


All the recipes I post on this site have been tested and tried by me. Most of them I make, remake, and remake again and again, time after time. Once the recipes are posted, I often come back to them and follow them as if I were in your shoes. The reason is, I like those recipes and I want to eat them again!

So this week I felt like doing my Toblerone chocolate mousse, which I did. And it was a disaster. It didn’t turn out the way I thought it would and its taste was not even close to what it tasted like the first time around. The texture was also pretty gross! So I went back to my recipe and did a little research… and redid it for a third time, only slightly differently.

They say the third time’s a charm. Well it is! This time I nailed it. It’s absolutely delicious and decadent. I’ve made a few changes to the recipe and you too should nail it each and every time you make it. If you’re interested in trying it out for the first time go for it blind folded; or, if you’ve tried it out and thought it wasn’t as good as expected, please try it again. This time around you won’t be disappointed!

Thanks for your understanding and again, I’m really sorry for the inconvenience… I guess these things happen, even to the best of us! 


http://figareau.blogspot.com/2011/09/weekend-decadence-toblerone-chocolate.html

Monday, November 28, 2011

Oyster Season Is Still On So Have Some More


Because it’s still oyster season I’m going to write again about the sea’s gem! Of course, some of you probably hate the damn thing and I kind of understand you. Who wants to eat a raw, slimy and salty mollusk? Not many. But trust me, once you try the slimy beast, you might realize how good and refined it actually is. And you just might get addicted to it, even if it’s against your own good will!

There are easier ways to start eating oysters than to have them naked and raw. Although they’re not my favorite once cooked, they can be easier to gulp on once they’re not raw. Plus, if you add some flavor to them, a taste to which you might not be accustomed to becomes more subtle. But take it to the next level fast; cooked oysters might be good but they’re not the real deal. And if you want to pass as an oyster lover, people won’t believe you if the only way you like yours are cooked with a bunch of unnecessary ingredients on top.

The best way to eat an oyster is still raw with a hint of lemon but hey, if you’re gonna eat a lot of them and often, why not try different variations? Here are some of my favorites!


OYSTER WITH CUCUMBER AND MINT SALSA

INGREDIENTS  
1 small Lebanese cucumber, deseeded and finely diced
½ red onion or shallot, finely chopped
2 tbsp soy sauce
4 tbsp rice vinegar
2 tbsp lemon juice
1 tbsp fresh mint, chopped

PREPARATION
In a bowl, mix of the ingredients. Spoon a little on top of freshly opened oysters. Serve immediately .

Note: Add the mint to the salsa only when ready to serve. If not, the mint will become brown.  


BACON AND GRUYÈRE OYSTERS

INGREDIENTS
¼ cup 35% cream
1 tbsp olive oil
1 shallot, finely chopped
¼ cup grated gruyere cheese
1 tbsp Dijon mustard
4 slices of bacon cut in small pieces
6 oysters

PREPARATION
Open the oysters and put them in a bowl with the juice. Keep the bottom of the shells.

In a skillet, cooked the bacon pieces until they become nice and crispy. Place on an absorbing paper and take off the excess fat. Set aside.

In a saucepan, heat the cream and reduce it by half.

In a skillet, cook the olive oil and the shallot. Add the cream and the oyster juice. Blend well.

When ready to serve, preheat your oven to broil. Place the bottom shells on a cooking sheet and put an oyster back in each shell. Put a small spoonful of the cream mixture on top of the oyster and top off with some gruyere cheese and crispy bacon. Put in the oven and cook until the cheese has melted and is slightly golden.

Note: Be very careful, the shell will be dangerously hot when you take it out of the oven so it’s better to eat with a small fork.


Thursday, November 24, 2011

A Snowy Day Requires a Good Meat Fix: Braised Veal

I’m having such a great time trying out braised meats these days, the only thing stopping me from making more is the fact that I like to eat fish about 3 times a week! I like meat a lot but I usually like it when it’s almost raw, not cooked for hours. I’ve always believed that meat cooked for longer than 3 minutes ends up hard to chew and tasteless once put in the mouth. For some weird reason, it took me about 3 decades to discover that meat cooked for more than 3 minutes (more like 3 hours!) could actually be a melt in your mouth and super tasty experience.

I’m only at the beginning of my experiments but I’ve actually tried to braise spare ribs, veal roast, duck breasts and beef cubes. Not all of my experiments turn out great. Yes, there are some nights where we concentrate on eating the rice rather than the meat (that braised duck breast was a total disaster!). But hey, you’ve got to miss a few to figure out some amazing recipes!!

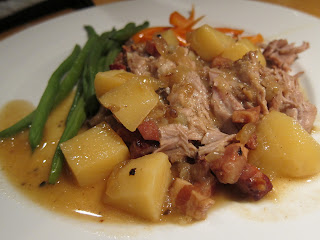
My veal was a case of, well, can I say it? Pure genius! It’s a melt in your mouth meal with tasty smoky veal and soft potatoes as a bonus. On a day like today, when it’s snowing outside and all you feel like is staying in with your loved ones, this is a perfect dinner treat.

BRAISED VEAL ROAST
Makes about 6 servings
 
INGREDIENTS
1 Veal roast, about 1kg
½ cup flour
Salt & pepper
1 tbsp olive oil
2 onions, chopped in diced
1 cup smoked lard cubes
1 ½ cups mushrooms, chopped
2 cups dry white wine
2 cups chicken broth
3 potatoes, peeled and diced

PREPARATION
Preheat your oven at 300˚F.

Put the flour on a plate and roll the roast in it. Cover the roast with salt & pepper. Keep the leftover flour on the side.


In a skillet, heat the oil over high heat. Sear the roast on each side so they become nice and brown. Take the roast out of the skillet and keep on the side.


Bring the heat to medium-high and add the onions and lard cubes. Cook for a few minutes, until the onions are translucent. Add the mushrooms and cook for about 2 more minutes. Poor the wine and let reduce of about ¼. Finally, slowly add the leftover flour to thicken the sauce.


In a large ovenproof pot, put the roast. Poor the onions and lard mixture on top and add the chicken broth.

Put in the middle of the oven, covered, and cook for 1-hour ½. Add the potatoes and cook for another 1 ½ hour.

When ready to serve, undo the roast in filaments and serve with nice colorful vegetables.


Note: You can make your roast up to 3 days in advance. Reduce your cooking time to 2 hours. When about to serve, heat in the oven for about 1 hour at 300˚F.  

Monday, November 21, 2011

Gratin Dauphinois When The Cold Hits The City


I’ve never been a huge potato fan. I’m not sure why but I think it’s because of a teenager’s misconception that potatoes make you fat. The thought has always stuck in my mind and I never got around to appreciating the starchy plant. The only way I absolutely love my potatoes is when I eat fries… but then it’s a given that fries can make you fat (not because of the potato itself but because of the oil it’s cooked in!) so I tend to eat them only on really special occasions (treat time!)

Potatoes can actually quite good for you. They mainly contain vitamin C and potassium but also contain a bunch of other nutriments. They have similar physiological effects and health benefits as fiber. Still, a potato is a carbohydrate so it’s better you don’t eat some everyday!

A Gratin Dauphinois is a French way of preparing potatoes, which mainly means they are cooked in milk and then finish in the oven. You can make your gratin a bunch of different ways but I like mine with a little bit of melted cheese on top. If you don’t like cheese, skip the ingredient; your potatoes will still taste great.

GRATIN DAUPHINOIS
Makes 4 servings
 
INGREDIENTS
3 potatoes, peeled and thinly sliced
¼ cup butter
2 garlic cloves, minced
½ cup 35% cream
About 2 cups milk
Salt & pepper
1 cup Gruyere cheese, grated
Pinch nutmeg (optional)

PREPARATION
Preheat your oven at 360˚F.

Clean and peel the potatoes. Slice them very thinly (no more than 3mm) and don’t put them under the water (or else you’ll lose the starch).


Put the potatoes in a small pot and cover them with milk. Add the garlic, salt & pepper, and nutmeg. Bring to a boil. Lower the heat and cook for about 10 minutes.


Take out of the milk a place in an ovenproof plate. Poor the cream on top of the potatoes and place small butter cubes on top. Cover with cheese.


Place in the oven and cook for about 1 hour.


Note: I put my ovenproof dish on a baking dish to avoid spillage.

Friday, November 18, 2011

Figareau se montre le bout du nez à Par ici la sortie!


This message is in French as it concerns local TV show! Sorry for those who are too far to see it!!!

Pour celles (et ceux) qui apprécient la nouvelle chaîne Mlle, sachez que je ferai partie de l’émission ‘Par ici la sortie’qui sera diffusée tout au long de la semaine du 2 décembre! En effet, j’ai eu le plaisir de concocter quelques bouchées pour les animatrices qui en ont profité pour me poser des questions sur mon concept de Chef à la maison et sur mon blogue. L’expérience du tournage a été excitante et enrichissante; j’espère que je passerai bien à la caméra! Je peux déjà vous dire que les animatrices ont semblé apprécier leurs bouchées! 

Si le coeur vous en dit, encouragez-moi en m’envoyant vos critiques constructives… Qui sait où une telle aventure pourrait mener Figareau?  


Tuesday, November 15, 2011

Cool Brunch With a Spanish Potato Tortilla

Ok, I feel really bad and my conscience is having a hard time sleeping at night. I realize I haven’t written in the past two weeks… at least. The worst part is that I haven’t really been cooking either. That’s a horrible, horrible thought! But I have great excuses (of course!): sick kids, the end of a construction site and, no free time. But things are back on track and I have some new recipes to share, plus stuff that I’m planning to try out in the next few weeks. So to you, my awesome readers, I apologize if I’ve let you down a little and I promise I’ll try to make it up to you. Do you forgive me?

This weekend we had a great big brunch with friends and we all had to bring a little something. With little time on my hands, I really had a rough time deciding on what to bring. I almost went to the market to buy a ready-made quiche; but that’s just not me. And to be honest, I sometimes find it harder to go out and find a great ready-made meal than to take the time to make it on my own (I know, that sounds weird!). So I looked in my fridge, only to find that it was almost empty… except for a bunch of eggs and some leftover cooked potatoes. What to do with so little ingredients?

That’s when it hit me. Why not make a really nice Spanish tortilla? They’re simple to make yet super tasty and it’s the perfect thing to eat around noon! Lucky me, I have a small Spanish cooking book at home so I took a look at it to make sure my version of the tortilla was made according to pure traditional Spanish style. And it was! I believe it was a success with everyone and it sure relieved me to know I was bringing something great and up to everyone’s expectation for an amazing brunch!

SPANISH POTATO TORTILLA
Makes about 8 servings

INGREDIENTS
2 onions, finely sliced
3 potatoes, diced
2 garlic cloves
7 eggs
2 tbsp olive oil
Salt & pepper

PREPARATION
In a large skillet, heat the oil. Over medium-high heat cook the onions until they are transparent. Take them out of the skillet and put them on a separate plate, leaving the leftover oil in the skillet.


Add the potatoes and the garlic and cook them. When they are ready, add the onions. Blend well and take off the heat. Let cool.

In a bowl, whisk the eggs and add salt and pepper. Add the potatoes and onions to the mixture and let sit for about half an hour.


Heat some olive oil in a pan over medium-low heat. Add the egg mixture and cook. When the eggs are cooked to your taste (some like them a little juicy!), take off the heat and place a plate on top of the pan. Delicately flip the tortilla on the plate.


Serve hot with a nice salad or cold, diced in small bite size.

Note: I had some leftover potatoes from a previous dinner. So I used them instead of arranging some fresh ones. They were already seasoned so I took it easy on the salt and pepper.  


Friday, October 28, 2011

A Great Little Halloween Soup For Your Little Monsters


This coming weekend is my favorite one of the entire year. Halloween is always a great weekend and the parties are usually amazing. There’s something magical about people dressing up and there’s definitely a special energy in the air on monster night.

What better way to celebrate the black and orange holiday than to use one of its main elements: pumpkin! Ok, butternut squash ain’t no traditional looking pumpkin, but it is a pumpkin! Its nice and musky taste will surely please your guests… and your kids! The texture of this soup is unbelievably smooth and rich; it’s really a pure pleasure to eat. Plus, with a hint of ginger, you’ll be protected against the flu, because it’s also flu season (in this house it is anyways!).

If you’ve got a pumpkin leftover on Monday night  (a real Halloween pumpkin, I mean!) and you don’t know what to do with it, switch the butternut squash for the pumpkin, it’ll be almost as good and you won’t lose your lovely pumpkin.


BUTTERNUT SQUASH SOUP
Makes about 8 servings

INGREDIENTS
1 tbsp olive oil
1 butternut squash cut in medium size cubes
1 onion, roughly chopped
3 garlic cloves, chopped
2 tsp fresh ginger, chopped
6 cups chicken broth
Salt & pepper

PREPARATION
In a large pot, heat the olive oil over medium heat. Add the onion and let them sweat for about 3 minutes. Add the butternut squash, garlic and ginger. Cook for about 2 more minutes. Cover with the chicken broth and add some pepper.


Bring to a simmer and cook over medium-low heat for about 30 minutes. Let cool.

Once it’s cooled, mix in a blender until you obtain a nice luscious texture. Taste and add some salt if needed. Serve hot.

Note: I didn’t have to add any salt to mine… so think about it twice if you’re going to!


You can add cream if you feel like it. Why not, it’ll be great! 


Monday, October 24, 2011

When A Good Surprise Comes On A Plate: Veal Cutlets


Once in a while I try a new recipe I’m not convinced about. We’ve all got our personal taste and while some recipes might inspire you, it might not correspond to my idea of a good one. Still, once in a while, you have to go out of your comfort zone and try something you just don’t know if it’ll work out. I think this is what happened with this recipe.

I won’t hide it; I go to Costco every once in a while… if not every week or so! Hey, I’ve got a lot of diapers to buy so I’d rather do it there than at Walmart, if you know what I mean! Anyways, Costco holds a great selection of excellent meats, surprisingly. The other day, I decided to buy a pack of really really nice veal cutlets, bone on. I don’t know what took me but a simple glance at the pink meat got me straight to the heart; I had to buy it!

But when I got home, I was stuck. I really didn’t feel like simply grilling the damn thing; I felt like making it shine, I just didn’t know how. So I searched the web hoping to find inspiration. It was hard… It was a day my fridge was a little empty so I didn’t have most of the needed ingredients for the recipes. And then I found this recipe. I don’t know, there was something weird about mixing coconut milk with veal… but because I had coconut milk, it was what I was going to make. And OH BOY did I not regret it. This recipe was soooooooo tasty and yummy I literally licked my plate. The meat was amazingly nice and juicy and the sauce was simply delicious.

Which is why I love to go out of my comfort zone. Out of 3 trials, sure, I’ll miss twice but that time I won’t miss, it’ll be a real treat for the mouth and stomach!

MILK FED VEAL CUTLET WITH COCONUT MILK SAUCE
Makes 4 servings
 
INGREDIENTS
1 tbsp vegetable oil
4 veal cutlets (about 175g each), with bone
1 can of coconut milk (398ml)
½ cup chicken broth
2 garlic cloves, minced
1 shallot, thinly sliced
4oz fresh mushrooms, sliced
1 tsp Chinese 5-spice
The zest of 1 lemon
Salt & pepper

PREPARATION
In a skillet, heat the oil over medium-high heat and cook the cutlets for 1 minute on each side. Take the cutlets off the heat and keep them on a side dish.

Add the coconut milk and the chicken broth in the skillet. Bring to a boil. Add the garlic, shallots, mushrooms, 5-spice and lemon zest. Add salt and pepper to taste. 

Put the cutlets back into the skillets and bring the heat down to medium-low heat. Cover and let simmer for about 20-25 minutes or until the sauce thickens and the meat is tender. Serve the cutlets covered in sauce.


Note: Veal is perfectly safe if it’s slightly pink on the inside.

You can serve you veal with lemon pasta or, as I did, a mushroom risotto. 


Wednesday, October 19, 2011

Our Own Little Oyster Party


If I were stuck on an island and I had no choice but to eat one thing forever, it would be oysters. It is most certainly one of the things I prefer in life. Those juicy molluscs  are simply amazing to me! You can find them all year round at your favourite fish store but the best time to have them, the year’s high season, is in October, November and December.

For the past 2 oyster seasons I’ve been pregnant. And with being pregnant comes a big warning: do not eat any live bate. Which means, no raw oysters while you’re pregnant. So for the past 2 years I’ve been missing out on one of my favourite things in the world, which totally sucks. Ok, I’ve got 2 amazing kids but still… it’s really hard not to eat something you love for such a long time. Think about it… if you couldn’t eat chocolate for 2 years, how would you feel?


The other day my husband and I caught up with lost time and had our own little oyster party. It was a real mollusc fiesta, the best party ever!! We bought 5 different kinds of oysters and just ate them with fresh lemon juice, our favourite way to eat the small beast. Of course, you can eat oysters all sorts of way but to us, lemon stays the best.


Atlantic oysters tend to be briny and crisp on the tongue, you can taste the saltiness of the ocean. Pacific oysters are less salty in flavour and have a creamier, mineral type of taste; they can be fruity and a bit sweet! Kumamoto oysters resemble the Pacific oyster, but are more complex and quite mild, with a creamy texture and buttery finish. Try all types and see the difference!!

The oysters we ate are all Atlantic oysters. To be more specific, they all come from Prince Edward Island.

Cavendish: very close to the malpèque; mildly salty and sweet.
Giant Malpèque: classic oyster, easiest to eat; light in flavour with a mild finish. 
J’adore: chewy, filled with juice and delicate in taste. 
Lucky Limes: mildly salty and sweet. 
Raspberry point: very salty and sweet; very tender.

As for facts, did you know that 4 medium-size oysters provide the recommended daily allowance of selenium, iron, manganese, phosphorus, zinc and vitamin B12?

Plus, with only 10 calories per oyster, you can eat a whole lot of them without feeling guilty!
If you’ve never had any oysters before, please do me a favour and try at least one. Ask your fish guy to show you how to open one and then try it yourself. If you’re opened to new tastes, this is a taste you might get hooked to!!